Hello my lovely ones, how are we all on this rather drizzly Sunday. It’s a bit nippy isn’t it. It is May right? Hmm. Well I am loving wearing my warm snuggles still. And definitely love crocheting and knitting them too! My feet are still snuggled up in at least 4 pairs of yarny yumminess. Not quite as bad as the depths of winter, when it’s usually 7, but nearly there. I swear we had paddling pools out, this time last year. We definitely had sun cream on, didn’t we? Oh well. Sure it will get better soon.
I had my first vaccine on Friday. Was slightly worried about the whole delightful side effects that can occur, but luckily we have only suffered slightly. My arm is definitely still feeling the love of the vaccine though, but luckily not bad enough for no crocheting or knitting! Phew!! My little lady decide to snuggle up to me, with her crocheting, which was a treat in itself.
So I wanted to jump on here to show you these amazing projects bags from the wonderful Lisa over at For The Love of Yarn.
If you haven’t visited her website recently, then you are seriously missing out! Here’s the link.
I bought mine from Lisa last month and have been carrying it around ever since. It’s such a simple, yet super functional bag. I bought mine when I started my knit socks challenge with Michelle over at The Loveliest Yarn Company. It’s a great size for a big ball of yarn and your needles & bits that go with sock knitting.
I have also used it for a silk shawl, which again the full amount of yarn & the shawl itself fitted inside the bag. So that was a massive plus for me.
I think if you wanted to take a crocheting or knitting kit as well & a few other bits, you may want the larger size. There are two sizes to the bags. My daughter has the larger size, that you can see here. Guessing it just depends on what you want the project bag for. Mine is the sock project bag & the larger is called the signature project bag. Ooooo, there’s a needle roll & a little notions pouch too! I had better start saving my pennies!!
There are lots of other fabrics to choose from too, so there is something for everyone! Ooo, you could mix and match!!! Ekkk!!!
I think one of the major bonuses for me, is the square base that they have. It’s great as the bag stands up, regardless of what you have in it. Nothing ever falls out, as it doesn’t tip over like a lot of other project bags. And I can’t do a proper review without talking about the handle!
Ok, hands up, I have used the handle of the bag, to carry around my project & crochet/knit at the same time. If any of you have little ones, you will definitely understand when I say – there are moments when you can totally knit/crochet whilst a little one is happily playing. But then all of a sudden they zoom off in a different direction! So with a project bag that goes over your arm – it takes the opportunity of crocheting/knitting to a whole other level! Another bonus of the handle is that it hangs off your chair whilst you are crocheting/knitting.
Now this chair could be in your garden, in your living room, bit more importantly – on the beach!!! Oh my! Can’t wait for that to happen! I know it’s a bit sad, but I have already tried it on my beach chair, in our garden & it works a treat!! Haha! So as and when a beach trip occurs, this little lady will be coming with me!!!
So to summarise, I absolutely love my little project bag from The love of Yarn! I cannot recommend it enough!! Hope you are one of the lucky ones, that has one in your life!! Fingers crossed!!
Being a mum of two little ones, I am constantly in need of carrying things. You would be amazed what I seem to carry in my hands. My mother-in-law described me as a pack horse the other day – I don’t think she was far off. One of my main problems is the school run. My eldest is in school, so as many of you know, the school run is an inevitable part of the day. The little man is thus taxied back and forth in either his pram or sling.
Now here comes the necessity of the bag part!! If I have the pram, not a problem I can carry a whole host of after school drinks and snacks (for some reason, she comes out of school ravenous!) and obviously some form or house key and phone. But the sling is a whole different ball game. A bag isn’t easy to carry whilst wearing a sling. So my poor son had to cope with all sorts of things stuffed into the sling. It is amazing what you can squidge in there. I managed to carry apples, flapjacks, brioches (luckily in a packet), pears, all in the layers of the sling. Not something you should do really, especially if you are trying to make a good impression with the other mums on the school gate. ‘Here’s your rather squished, but delicious brioche darling’ Haha. Not good. My daughter thought it was great, like a magic trick, but she will make light of anything. Bless her.
So my Rainbow Drop bag was born. ( I think it is actually the first thing that I have ever made for myself.) I knew the strap needed to fit under the sling, so needed to be quite soft. Another requirement was the opening at the top. It needed to be pretty easily accessible for a little girl’s hand, who I knew would be delving in there as soon as she was out of the classroom door. So I started to play around with some DK cotton and created my rainbow bag. It’s a very simple pattern and easy to follow. Now once my daughter saw this bag start to take shape, a little request was put in. And then all of a sudden it was a “pleeaaaassseee can I have one!!” As I am sure you guys will start to realise, my daughter loves rainbows. I think it was one of the first things she could draw. She just can’t get enough of them. Hmmm, maybe its because her mother likes them so much too – haha. You can see where PipsRainbow name came from. My daughter managed to choose her colours and a smaller rainbow bag was created. This is called the Rainbow Droplet Bag. It’s a lovely size for a little girl. She likes to carry a teddy bear in it, when we go out.
With colours, you can choose whatever combo you like. In my case it just had to be rainbow coloured. But obviously for yourself, you can make it in any which colour way you like. It might be nice with just three or four colours alternated. It is totally up to you. Now I have used Double Knit 100% Cotton with a 3mm hook. This meant it was a much tighter weave, so stronger. But you can always make it in another yarn. This pattern can easily be made in Aran weight, but it would give you a much bigger bag. Don’t forget to use a 5mm hook, if you use Aran. (You made need to use less colours for the strap of you make it in aran.)
I have written both patterns here in this post.
Supplies – For both bags
A variety of 50g DK cotton colours, 3mm crochet hook, scissors, blunt ended tapestry needle.
So here we go …
My Rainbow Bag
1 – Magic ring, chain 3. 11tr. (12)
Chain 3. (This counts as one of the 12 tr)
Crochet 11 tr.
Pull tail to close up magic ring.
2 – Chain 3, 2tr in next stitch, Repeat 1tr, 2tr into next stitch 5 times. Slip stitch (ss) & fasten off. (18)
3. Join colour, chain 3 (don’t forget this counts as your first treble). 1tr, 2tr into next stitch. Repeat 2tr & 2tr into next stitch 5 times, Ss & fasten off. (24)
4 – Join colour, chain 3, 2tr & 2tr into next stitch. Repeat 3tr & 2tr into next stitch. Ss & fasten off. (30)
5 – Join colour, chain 3. 3tr & 2tr into next stitch. Repeat 4tr & 2tr into next stitch 5 times. Ss & fasten off. (36)
6 – Join colour & chain 3. 4tr & 2tr into next stitch. Repeat 5tr & 2tr into next stitch. Ss & fasten off. (42)
7 – Join colour & chain 3. 5tr & 2tr into next stitch. Repeat 6tr & 2tr into next stitch. Ss & fasten off. (48)
8 – Join colour & chain 3. 6tr & 2tr into next stitch. Repeat 7tr & 2tr into next stitch. Ss & fasten off. (54)
9 – Join colour & chain 3. 7tr & then 2tr into next stitch. Repeat 8tr & 2tr into next stitch. Ss & fasten off. (60)
10 – Join colour & chain 3. 8tr & then 2tr into next stitch. Repeat 9tr & 2tr into next stitch. Ss & fasten off. (66)
11 – Join colour & chain 3. 9tr & then 2tr into next stitch. Repeat 10tr & 2tr into next stitch. Ss & fasten off. (72)
12 – 23 tr
12 – Join colour & chain 3. 10tr & then 2tr into next stitch. Repeat 11tr & 2tr into next stitch. Ss & fasten off. (78)
13 – Join colour & chain 3. 11tr & then 2tr into next stitch. Repeat 12tr & 2tr into next stitch. Ss & fasten off. (84)
14 – Join colour & chain 3. 12tr & then 2tr into next stitch. Repeat 13tr & 2tr into next stitch. Ss & fasten off. (90)
15 – Join colour & chain 3. 13tr & then 2tr into next stitch. Repeat 14tr & 2tr into next stitch. Ss & fasten off. (96)
16 – Join colour & chain 3. 14tr & then 2tr into next stitch. Repeat 15tr & 2tr into next stitch. Ss & fasten off. (102)
17 – Join colour & chain 3. 1tr into each stitch, ss & fasten off. (102)
Join colour & chain 3. Repeat 10tr & 2trtog. (2trtog – crochet 2trs together into the same stitch) Ss & fasten off. (66)
I used 6 colours for the strap, but there are 12 rows, so you could use less or more colours. I have used the same colour on either side of the strap & round the edges. This will give it a neater edge.
Join the edge colour, by slip stitching & chain 291. (Don’t forget this is just a guide as you can make the strap longer or shorter according to how many chain stitches you put in at the beginning. Now count from the beginning of the chain stitches 12 & then join this length of chain to the other side of the bag with a slip stitch.
*Attach next colour as before with a slip stitch and chain 1. Then dc 290 & slipstitch into other side as before*. Repeat ** this 10 more times. Now 1dc on either side of the strap (21 stitches) with your first edge colour. This will finish the top of the bag nicely.
Now it’s time to weave in all your ends. If you wanted to you could add a little loop with 3 of your colours plaited & a button either side of the bag. This would mean the wearer could close the top of the bag. Length of the plait would depend on the size of the button you have chosen.
Oh my, this could take a while!!!!
I hope you have enjoyed making this bag. If you have any queries, don’t hesitate to contact me. Now if you are like me and have a daughter that wants things just like her Mummy, then you may need to make a child’s size one. This is a much smaller bag and strap. Now obviously, you can change the length of the strap by either increasing or decreasing the amount of chain stitches at the beginning.
Rainbow Droplet Bag
Ok so let’s get started.
Mummy & Daughter!!
1 – Magic ring, chain 3. 11tr. (12)
2 – Chain 3, 2tr in next stitch, Repeat 1tr, 2tr into next stitch 5 times. Slip stitch (ss) & fasten off. (18)
3. Join colour, chain 3 (don’t forget this counts as your first treble). 1tr, 2tr into next stitch. Repeat 2tr & 2tr into next stitch 5 times, Ss & fasten off. (24)
4 – Join colour, chain 3, 2tr & 2tr into next stitch. Repeat 3tr & 2tr into next stitch. Ss & fasten off. (30)
5 – Join colour, chain 3. 3tr & 2tr into next stitch. Repeat 4tr & 2tr into next stitch 5 times. Ss & fasten off. (36)
6 – Join colour & chain 3. 4tr & 2tr into next stitch. Repeat 5tr & 2tr into next stitch. Ss & fasten off. (42)
7 – Join colour & chain 3. 5tr & 2tr into next stitch. Repeat 6tr & 2tr into next stitch. Ss & fasten off. (48)
8 – Join colour & chain 3. 6tr & 2tr into next stitch. Repeat 7tr & 2tr into next stitch. Ss & fasten off. (54)
9 & 10 – Join colour, chain 3, 1tr in each stitch. Ss & fasten off. (54)
11 – Join colour & chain 3. 7tr & then 2tr into next stitch. Repeat 8tr & 2tr into next stitch. Ss & fasten off. (60)
12 – Join colour & chain 3. 8tr & then 2tr into next stitch. Repeat 9tr & 2tr into next stitch. Ss & fasten off. (66)
13 – Join colour & chain 3. 9tr & then 2tr into next stitch. Repeat 10tr & 2tr into next stitch. Ss & fasten off. (72)
Round 14 & 15 Join colour, chain 3, 1tr in each stitch. Ss & fasten off. (72)
Round 16 – Join new yarn & chain 3. 9tr & 2trtog. Repeat 10tr then 2trtog 5 times. (2trtog – is 2 treble crochets together to make one stitch. (66)
Round 17 – 21 Join colour, chain 3, 1tr in each stitch. Ss & fasten off. (66)
Round 22 – Join new yarn & chain 3. 8tr & 2trtog. Repeat 9tr then 2trtog 5 times. (2trtog – is 2 treble crochets together to make one stitch. (60)
Round 23 – Join new yarn & chain 3. 7tr & 2trtog. Repeat 8tr then 2trtog 5 times. (2trtog – is 2 treble crochets together to make one stitch. (54)
Now it’s time to weave all the ends in with a tapestry needle.
Now for the strap.
I used 6 colours for the strap, but there are 12 rows, so you could use less or more colours. I have used the same colour on either side of the strap & round the edges. I think it’s gives more of a neater edge, but it’s up to you.
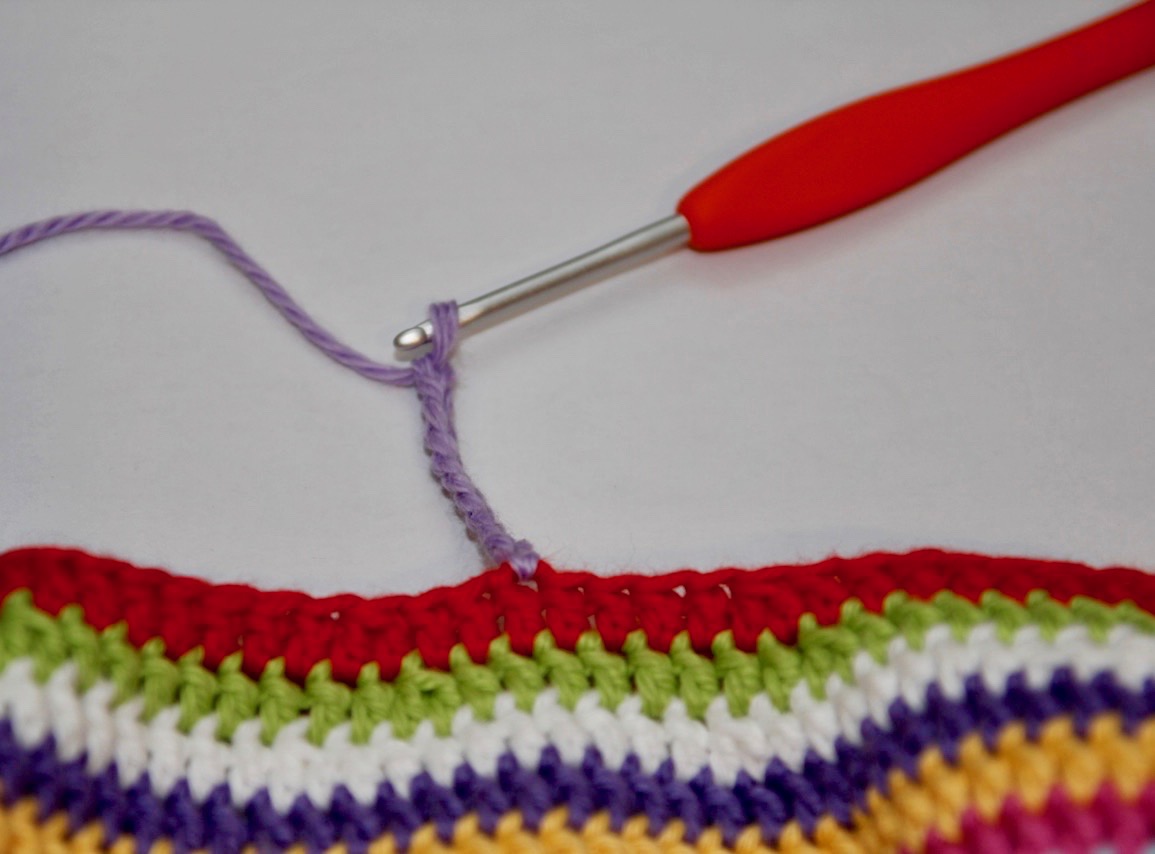
Join the edge colour, which in my case is lilac, by slip stitching & chain 231. (Don’t forget this is just a guide as you can make the strap longer or shorter according to how many chain stitches you put in at the beginning. Now count from the beginning of the chain stitches 21 & then join this length of chain to the other side of the bag with a slip stitch.
*Attach next colour as before with a slip stitch and chain 1. Then dc 230 & slipstitch into other side as before*. Repeat ** this 10 more times. Now 1dc on either side of the strap (21 stitches) with your first edge colour. This will finish the top of the bag on nicely.
Now it’s time to weave in all those lovely ends. To do this, you need to use a blunt ended tapestry needle.
Don’t forget to share your creations – I would love to see what you come up with.


