Year of the Stitches Week 42 – Paired Popcorn Stitch

Paired Popcorn Stitch 

Well it’s birthday party season in our house still and this week was my daughter’s party. It was an extremely rainbowy, unicorny, fairy, crafty kind of a party at home and I think, was well received by all. We played all the traditional party games and made some rather gorgeous unicorns. We wanted to give her a party like we used to have as kids. It seems to have all changed now with big occasions and events that a child goes to. We’ve had a couple of farm parties and a woodland pirate treasure party which went down well, but I think the two we have had at home for friends are my favourites.

We had a treasure hunt of Smile Stones which my daughter made.

I think their favourite activity was the unicorn making! Their little faces when they found out they could make them and take them home was just priceless!! Wish I had it on video!!! They even added a little magic and wish inside before they sealed them up!!

This was daughter’s and you can imagine where it was snuggled up last night!!

I do think my rainbow addiction is getting worse though!! Look at these I found on the Internet!!! There’s some kind of a rainbow explosion occurred in our conservatory!!

Oh and I couldn’t resist making these!!!

Not only have we had my daughter’s party this wknd, but we’ve celebrated my brother-in-laws too!!  Now he is a keen landscape photographer. He has taken some incredible photos all over the country. So I definitely had to dedicate this weeks yarn colour to him. A warm and wonderful autumnal brown, one that can be found in many of his landscape photos. These were the slipper socks I made for him. I added a 4ply West Yorkshire Spinner yarn into the mix which gave them a much thicker feel and hopefully warmer too!

With all the party loveliness, we did manage to squeeze in a family country walk in the back of the woods near us.

Think it’s these morning family walks that make you feel alive and happy. We did feel left out though, in the sense that everyone we met had a dog!! One day… 🐾

Now this photo was taken for my father. Every year as children when autumn came we would play the leaf catching game. It’s ever so simple. You stand under a tree and attempt to catch a leaf floating down from the sky!! You would think it was easy, but it’s not!! Saying that my husband caught his first time!!! I reckon it was beginners luck!!!

Well here was our attempt! Hopefully next year my son can catch one!!

Oh and to finish off a family walk, you can’t beat a Melbourne in Lichfield coffee!!! Best drank in the sun!!

So I think we had better get onto the blanket and our lovely stitch this week. So this week it’s called the Paired Popcorn Stitch. Now we have already had the Raised Popcorn Stitch on the blanket. This is when a Popcorn Stitch sits on it’s own, well here we have two slightly smaller popcorns that sit together!! Great for an edging to a little one’s cardigan or even the cuff of a glove or scarf. Hope you like it.

Stitches –

Chain (ch) – To make a chain, place the yarn over the hook then pull it through the loop on your hook.

Double Crochet (dc) – Insert the hook through the stitch, front to back, then yarn over hook and pull back through stitch. You will have two loops on your hook. Then yarn over your hook and pull through both loops.

Treble (tr) – To make a treble crochet, firstly yarn over your hook, insert through space/stitch, yarn over your hook, pull back through space/stitch. There should now be 3 loops on your hook. Then yarn over hook and pull through the first two loops, yarn over hook and pull through the last two loops.

Popcorn Stitch (Ps) – Work 5tr stitches all in the next stitch. Then remove your hook from the loop at the top of the last tr stitch and reinsert it back into the top of the first tr stitch. Then collect up the loop from the last tr stitch and pull through to complete the popcorn stitch.

Supplies

Right so this week my colour is a lovely warm and cosy orangy/brown colour, representing all the magnificent leaves surrounding us at the minute. Definitely one of the best times of the year. I also wanted to dedicate it to my lovely brother-in-law and his wonderful photographs!!

So I have used this lovely coloured soft yarn from the Wendy merino range. Mega soft and snuggable. So again you need to choose a double knit yarn of any kind. You roughly need about 30g/40g. Don’t forget your scissors and blunt ended tapestry needle. And of course your 4mm crochet hook.

Ok so here we go … 

1 – Ok so first things first, start on the wrong side of your blanket. Attach your new yarn and chain 1. Then work 1dc in the stitch and then 1dc in the next 2 stitches.

Now *chain 1, miss 1 stitch, work 2dc in the next stitch, then chain 1, miss 1 stitch and finally work 1dc in the next 3 stitches.*

Repeat this ** across the row. In the last few stitches of the row, chain 1, miss 1 stitch and work 2 dc in the next stitch. Then chain 1, miss 1 stitch then work 1dc in the last 2 stitches. (133)

2 – Ok so turn your blanket and chain 3. Now miss first stitch and work 1tr in the next dc stitch.

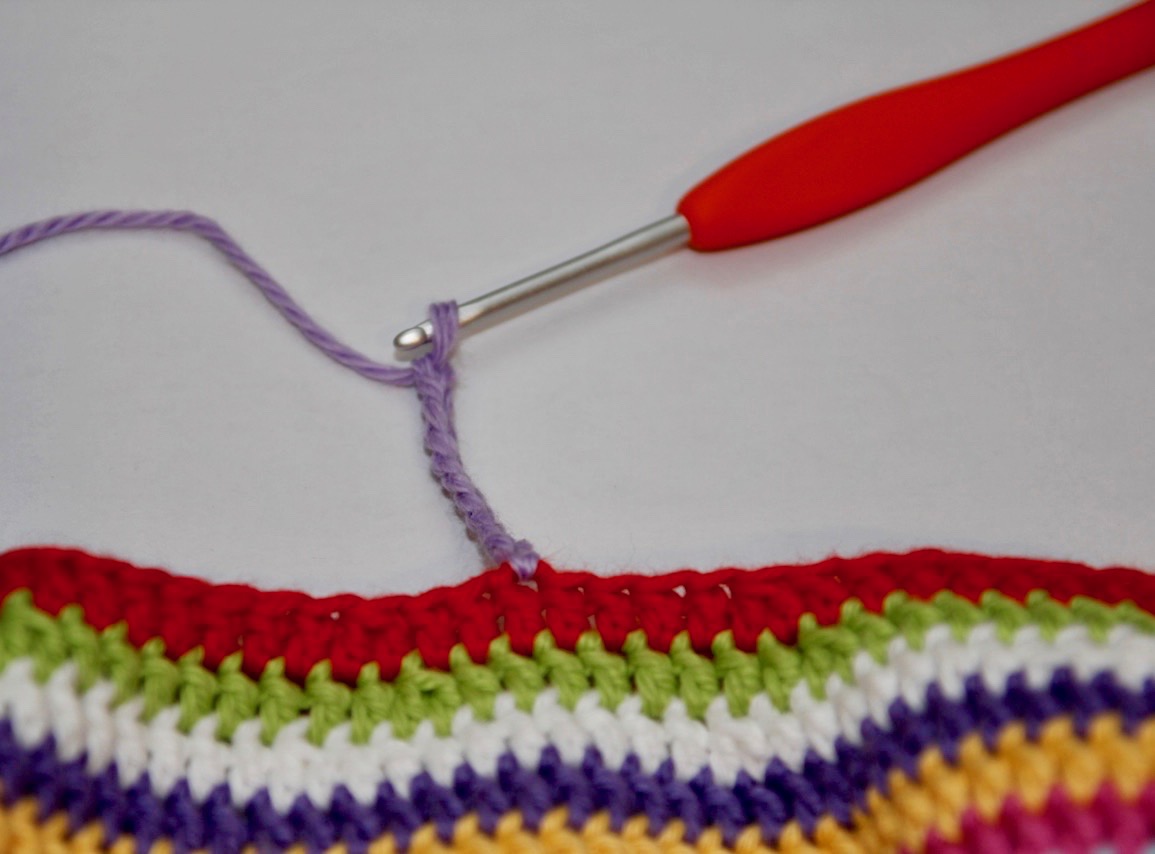
Right so now miss 1 chain, then work 1 Popcorn Stitch (Pc) in the next dc stitch. So to work a Popcorn Stitch you need to work 5tr stitches into the same stitch. Now you are going to take your hook out of the stitches, leaving a loop. You can see this on the photo below. Now reinsert it back into the top of the first Treble Stitch. This is where my hook is and grab the loop you made at the top of the last Treble stitch.

Pull the loop through the stitch to finish the Popcorn Stitch.

Now it’s time to chain 1 and work 1Pc in the next dc stitch.

*Now miss 1 chain and work *1tr in each of the next 3dc stitches. Work 1Pc in the next dc stitch, chain 1 then work 1Pc in the next stitch.* Repeat this ** across the row.

To end the row work 1tr in the last 3 stitches. (33 Popcorn Pairs)

3 – Turn your blanket and chain 1. Now work 1dc in the same stitch and then 1dv in the next 2 stitches. Now chain 1, miss 1Pc stitch and now work 2dc stitches in the next ch1sp. This is where the arrow is pointing. It’s looks like s large gap inbetween the 2 Popcorn stitches.

Now chain 1 and miss 1Pc stitch. Now work *1dc in each of the next 3 stitches, chain 1, miss 1Pc, work 2dc in the next ch1sp, chain 1 and miss 1Pc.* so repeat this across the row.

At the end of the row work 1dc in the last stitch and then top of the chain 3 from the previous row. (233)

So there you have the lovely Paired Popcorn Stitch.

Hope you have enjoyed this one. Any problems just give me a shout.

Happy hooking everyone!!

🌈Xx

Continue Reading

Rainbow Drop & Rainbow Droplet Bag Pattern

It’s all about the bags!

Being a mum of two little ones, I am constantly in need of carrying things. You would be amazed what I seem to carry in my hands. My mother-in-law described me as a pack horse the other day – I don’t think she was far off. One of my main problems is the school run. My eldest is in school, so as many of you know, the school run is an inevitable part of the day. The little man is thus taxied back and forth in either his pram or sling.

Now here comes the necessity of the bag part!! If I have the pram, not a problem I can carry a whole host of after school drinks and snacks (for some reason, she comes out of school ravenous!) and obviously some form or house key and phone. But the sling is a whole different ball game. A bag isn’t easy to carry whilst wearing a sling. So my poor son had to cope with all sorts of things stuffed into the sling. It is amazing what you can squidge in there. I managed to carry apples, flapjacks, brioches (luckily in a packet), pears, all in the layers of the sling. Not something you should do really, especially if you are trying to make a good impression with the other mums on the school gate. ‘Here’s your rather squished, but delicious brioche darling’ Haha. Not good. My daughter thought it was great, like a magic trick, but she will make light of anything. Bless her.

So my Rainbow Drop bag was born. ( I think it is actually the first thing that I have ever made for myself.)  I knew the strap needed to fit under the sling, so needed to be quite soft. Another requirement was the opening at the top. It needed to be pretty easily accessible for a little girl’s hand, who I knew would be delving in there as soon as she was out of the classroom door. So I started to play around with some DK cotton and created my rainbow bag. It’s a very simple pattern and easy to follow. Now once my daughter saw this bag start to take shape, a little request was put in. And then all of a sudden it was a “pleeaaaassseee can I have one!!” As I am sure you guys will start to realise, my daughter loves rainbows. I think it was one of the first things she could draw. She just can’t get enough of them. Hmmm, maybe its because her mother likes them so much too – haha. You can see where PipsRainbow name came from. My daughter managed to choose her colours and a smaller rainbow bag was created. This is called the Rainbow Droplet Bag. It’s a lovely size for a little girl. She likes to carry a teddy bear in it, when we go out.

With colours, you can choose whatever combo you like. In my case it just had to be rainbow coloured. But obviously for yourself, you can make it in any which colour way you like. It might be nice with just three or four colours alternated. It is totally up to you. Now I have used Double Knit 100% Cotton with a 3mm hook. This meant it was a much tighter weave, so stronger. But you can always make it in another yarn. This pattern can easily be made in Aran weight, but it would give you a much bigger bag. Don’t forget to use a 5mm hook, if you use Aran. (You made need to use less colours for the strap of you make it in aran.)

I have written both patterns here in this post.

Supplies – For both bags

A variety of 50g DK cotton colours, 3mm crochet hook, scissors, blunt ended tapestry needle.

So here we go …

My Rainbow Bag

1 – Magic ring, chain 3. 11tr. (12)

Chain 3. (This counts as one of the 12 tr)
Crochet 11 tr.
Pull tail to close up magic ring.

2 – Chain 3, 2tr in next stitch, Repeat 1tr, 2tr into next stitch 5 times. Slip stitch (ss) & fasten off. (18)

3. Join colour, chain 3 (don’t forget this counts as your first treble). 1tr, 2tr into next stitch. Repeat 2tr & 2tr into next stitch 5 times, Ss & fasten off. (24)

4 – Join colour, chain 3, 2tr & 2tr into next stitch. Repeat 3tr & 2tr into next stitch. Ss & fasten off. (30)

5 – Join colour, chain 3. 3tr & 2tr into next stitch. Repeat 4tr & 2tr into next stitch 5 times. Ss & fasten off. (36)

6 – Join colour & chain 3. 4tr & 2tr into next stitch. Repeat 5tr & 2tr into next stitch. Ss & fasten off. (42)

7 – Join colour & chain 3. 5tr & 2tr into next stitch. Repeat 6tr & 2tr into next stitch. Ss & fasten off. (48)

8 – Join colour & chain 3. 6tr & 2tr into next stitch. Repeat 7tr & 2tr into next stitch. Ss & fasten off. (54)

9 – Join colour & chain 3. 7tr & then 2tr into next stitch. Repeat 8tr & 2tr into next stitch. Ss & fasten off. (60)

10 – Join colour & chain 3. 8tr & then 2tr into next stitch. Repeat 9tr & 2tr into next stitch. Ss & fasten off. (66)

11 – Join colour & chain 3. 9tr & then 2tr into next stitch. Repeat 10tr & 2tr into next stitch. Ss & fasten off. (72)

12 – 23 tr

12 – Join colour & chain 3. 10tr & then 2tr into next stitch. Repeat 11tr & 2tr into next stitch. Ss & fasten off. (78)

13 – Join colour & chain 3. 11tr & then 2tr into next stitch. Repeat 12tr & 2tr into next stitch. Ss & fasten off. (84)

14 – Join colour & chain 3. 12tr & then 2tr into next stitch. Repeat 13tr & 2tr into next stitch. Ss & fasten off. (90)

15 – Join colour & chain 3. 13tr & then 2tr into next stitch. Repeat 14tr & 2tr into next stitch. Ss & fasten off. (96)

16 – Join colour & chain 3. 14tr & then 2tr into next stitch. Repeat 15tr & 2tr into next stitch. Ss & fasten off. (102)

17 – Join colour & chain 3. 1tr into each stitch, ss & fasten off. (102)

Join colour & chain 3. Repeat 10tr & 2trtog. (2trtog – crochet 2trs together into the same stitch) Ss & fasten off. (66)

Join colour & chain 3. Repeat 9tr & 2trtog Ss & fasten off. (60)

Now for the strap.

I used 6 colours for the strap, but there are 12 rows, so you could use less or more colours. I have used the same colour on either side of the strap & round the edges. This will give it a neater edge.

Join the edge colour, by slip stitching & chain 291. (Don’t forget this is just a guide as you can make the strap longer or shorter according to how many chain stitches you put in at the beginning. Now count from the beginning of the chain stitches 12 & then join this length of chain to the other side of the bag with a slip stitch.
*Attach next colour as before with a slip stitch and chain 1. Then dc 290 & slipstitch into other side as before*. Repeat ** this 10 more times. Now 1dc on either side of the strap (21 stitches) with your first edge colour. This will finish the top of the bag nicely.

Now it’s time to weave in all your ends. If you wanted to you could add a little loop with 3 of your colours plaited & a button either side of the bag. This would mean the wearer could close the top of the bag. Length of the plait would depend on the size of the button you have chosen.

Oh my, this could take a while!!!!

I hope you have enjoyed making this bag. If you have any queries, don’t hesitate to contact me. Now if you are like me and have a daughter that wants things just like her Mummy, then you may need to make a child’s size one. This is a much smaller bag and strap. Now obviously, you can change the length of the strap by either increasing or decreasing the amount of chain stitches at the beginning.

Rainbow Droplet Bag 

Ok so let’s get started.

Mummy & Daughter!!

1 – Magic ring, chain 3. 11tr. (12)

2 – Chain 3, 2tr in next stitch, Repeat 1tr, 2tr into next stitch 5 times. Slip stitch (ss) & fasten off. (18)

3. Join colour, chain 3 (don’t forget this counts as your first treble). 1tr, 2tr into next stitch. Repeat 2tr & 2tr into next stitch 5 times, Ss & fasten off. (24)

4 – Join colour, chain 3, 2tr & 2tr into next stitch. Repeat 3tr & 2tr into next stitch. Ss & fasten off. (30)

5 – Join colour, chain 3. 3tr & 2tr into next stitch. Repeat 4tr & 2tr into next stitch 5 times. Ss & fasten off. (36)

6 – Join colour & chain 3. 4tr & 2tr into next stitch. Repeat 5tr & 2tr into next stitch. Ss & fasten off. (42)

7 – Join colour & chain 3. 5tr & 2tr into next stitch. Repeat 6tr & 2tr into next stitch. Ss & fasten off. (48)

8 – Join colour & chain 3. 6tr & 2tr into next stitch. Repeat 7tr & 2tr into next stitch. Ss & fasten off. (54)

9 & 10 – Join colour, chain 3, 1tr in each stitch. Ss & fasten off. (54)

11 – Join colour & chain 3. 7tr & then 2tr into next stitch. Repeat 8tr & 2tr into next stitch. Ss & fasten off. (60)

12 – Join colour & chain 3. 8tr & then 2tr into next stitch. Repeat 9tr & 2tr into next stitch. Ss & fasten off. (66)

13 – Join colour & chain 3. 9tr & then 2tr into next stitch. Repeat 10tr & 2tr into next stitch. Ss & fasten off. (72)

Round 14 & 15 Join colour, chain 3, 1tr in each stitch. Ss & fasten off. (72)

Round 16 – Join new yarn & chain 3. 9tr & 2trtog. Repeat 10tr then 2trtog 5 times. (2trtog – is 2 treble crochets together to make one stitch. (66)

Round 17 – 21 Join colour, chain 3, 1tr in each stitch. Ss & fasten off. (66)

Round 22 – Join new yarn & chain 3. 8tr & 2trtog. Repeat 9tr then 2trtog 5 times. (2trtog – is 2 treble crochets together to make one stitch. (60)

Round 23 – Join new yarn & chain 3. 7tr & 2trtog. Repeat 8tr then 2trtog 5 times. (2trtog – is 2 treble crochets together to make one stitch. (54)
Now it’s time to weave all the ends in with a tapestry needle.

Now for the strap.

I used 6 colours for the strap, but there are 12 rows, so you could use less or more colours. I have used the same colour on either side of the strap & round the edges. I think it’s gives more of a neater edge, but it’s up to you.

Join the edge colour, which in my case is lilac, by slip stitching & chain 231. (Don’t forget this is just a guide as you can make the strap longer or shorter according to how many chain stitches you put in at the beginning. Now count from the beginning of the chain stitches 21 & then join this length of chain to the other side of the bag with a slip stitch.

*Attach next colour as before with a slip stitch and chain 1. Then dc 230 & slipstitch into other side as before*. Repeat ** this 10 more times. Now 1dc on either side of the strap (21 stitches) with your first edge colour. This will finish the top of the bag on nicely.

Now it’s time to weave in all those lovely ends. To do this, you need to use a blunt ended tapestry needle.

Don’t forget to share your creations – I would love to see what you come up with.

Xx


Continue Reading