
Beautiful England

Beautiful England. We are so lucky to live in such a beautiful place! The colour changes that we experience over the seasons is just incredible. I took this photo a couple of weeks ago whilst I was sitting on a bench feeding the little man a malt loaf. Most people were taking a leisurely stroll around the lake or zooming past on their bikes. Every so often came a harrased parent who was trying to get their child to ride their bike without their help or even just in the right direction. I suddenly looked up and there it was. This beautiful idealic snap shot of the English countryside in September. Most people would just say how pretty it was, but for me it was crocheting inspiration. It was the colours that grabbed me. The lushous green grass & trees, bright blue sky & then the beautiful yellow, purple and pink wild flowers scattered everywhere. Just incredible.
It amazes me when and how inspiration can hit you!! The colours in the picture just work so well together. They compliment each other. You can spend ages in a shop trying to decide which yarn colour goes with which, all the time feeling the pressure of the shop assistants beedy eyes staring down on you! But actually, if you just look outside, Mother Nature has done it for you.
Now this would make a stunning blanket, but me thinks it would also make some beautiful table mats or mandalas. Cold nights and wet and windy days are fast approaching us. Summer days in the garden with yummy BBQ’s sizzling, are now in the past unfortunately. My husband decided that day, after a bike ride in the sun, that we should have one last BBQ. It was blue skies & bright sun, so what could be more perfect. Needless to say the sun did not keep it’s hat on and he ended up barbequing in the cold and rain holding an umbrella. My daughter thought it was hilarious that daddy was standing in the rain holding a purple umbrella. Heyho, it was definitely worth it, but I’m thinking it might be the last of the year.
Maybe we need to bring the garden and countryside into the house for the colder months. A little bit of summer on the table, to remind us of those warm days. So why not a little mandala to put under our pots & plates to brighten up our table.
So let’s talk colours.
My September snap shot had – green, blue, yellow, white, purple, pink. Let’s match those up with some yarn. I love this part. Spending time upstairs hunting through drawers of yarn to see which suits the project best. Tends to be late at night when the little ones are in bed.

Supplies – I have used 12 different DK colours just in simple Style Craft or King Cole cotton, but you can use any yarn really. You will also need scissors, a blunt ended tapestry needle and of course a 4mm crochet hook. (Remember if you use a different weight yarn you will need to alter your hook size.)
I thought it was quite apt to call this my September Mandala, with all those September colours. Ooo imagine a mandala a month! Now there’s an idea!! Imagine the autumn colours one!!! Oooooo!!!!! October would be pretty incredible wouldn’t it. I remember as a child going up to Scotland in the autumn half term. The colours of the trees and their leaves were just incredible. Reds, oranges, yellows… Truly magical.
Ok getting side tracked.
I have given you the pattern in bullet points, but then taken some sneaky peak pictures and explained more thoroughly with those! Hope these help you. I have also written the pattern at the bottom of the post again but in its simplest form, for all you competent crocheters who know what they’re doing.
Level – Easy
Stitches – Here are a few of the stitches you will be using.
Magic Ring (mr) – For a magic ring, make a loop with the yarn, leaving a tail. (Make sure the tail is under the working yarn.) Now insert your hook into the loop, from the front to the back. Wrap the working yarn around your hook and pull the yarn through and pull tight to create a ring.
Slip stitch (ss) – This is where there is no height to the stitch. It’s usually used to join rounds. So insert the hook into the front of the stitch you are joining to. This is usually the first stitch you made in that round/row. So yarn over hook and pull through that first stitch then also through the loop on your hook.
Chain (ch) – To make a chain, place the yarn over the hook then pull it through the loop on your hook.
Double Crochet (dc) – To make a double crochet, insert hook through your stitch/space, yarn over hook and pull through the stitch. You should have 2 loops on your hook, now yarn over hook and pull through both loops on your hook.
Treble (tr) – To make a treble crochet, firstly yarn over your hook, insert through space/stitch, yarn over your hook, pull back through space/stitch. There should now be 3 loops on your hook. Then yarn over hook and pull through the first two loops, yarn over hook and pull through the last two loops.
Half treble (htr) – A half treble crochet is basically one less movement than a treble. So yarn over hook, insert through space/stitch, yarn over hook, pull back through space/stitch. There should be 3 loops on your hook. Then yarn over hook and pull through all 3 loops.
Double treble (dtr) – A double treble is quite a tall stitch. So yarn over hook twice, insert hook through the stitch/space and then yarn over hook again. Now pull the yarn through the stitch. There will now be 4 loops on the hook. Now place the yarn over the hook and pull through the first 2 loops. Then yarn over the hook again and pull through the next two loops. Haha, now place the yarn over the hook again and pull through the last 2 loops. Phew! It’s a bit of a long process, but a lovely stitch with the height that it gives.
So here we go 😁 …
1 – So start off with a magic ring (see tutorial if you are unsure.) Then chain 3 into the magic ring, this will give you the height for trebles and then work 7tr. (8 tr)

So to chain 3 you need to place your hook through your magic ring, put your yarn over the hook and pull back through the ring. Now yarn over your hook and pull through the loop on your hook. This is your first chain. Now *yarn over your hook and pull through the loop* then repeat ** one more time to make a chain of 3.

Now to make a treble crochet, so start by *yarn over your hook and then insert through the front of the magic ring. Then yarn over your hook again, which is what’s happening in this photo, then pull it back through the magic ring. This means you have 3 loops on your hook. So yarn over hook again and pull through the first two loops. So it will look like below.
To finish off, yarn over your hook and pull through the last two loops on your hook*. And that is your first treble crochet. You now need to repeat ** 6 more times to get 8 tr into your ring.

Well done, you’ve now worked 8 treble crochets (tr) in your magic ring.

It’s now time to pull that short little tail and create your ring. It’s as easy as that!

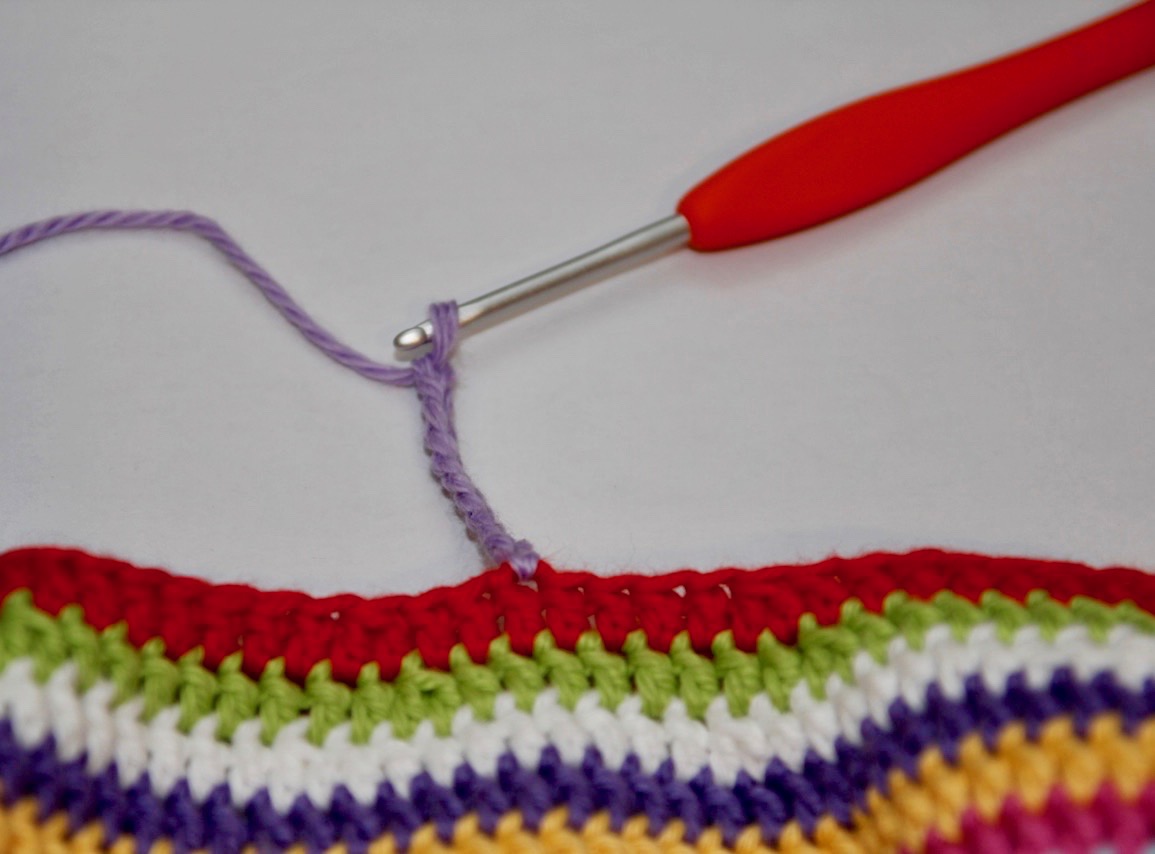
Don’t forget to slip stitch (ss) in the top of your original 3 chains and then fasten off. This means you will be ready to add your new yarn.
2 – Ok so round 2. Attach the new yarn into one of the stitches and chain 4. This counts as 1tr & 1ch. Now carry on round crocheting 1tr and chain 1 into each stitch. (8 tr & ch1)

First things first, make your 4 chains. This gives you the height and acts as your first treble crochet and chain 1.

Now it’s time to treble crochet into the next stitch. So *yarn over hook, insert through stitch, yarn over hook, pull through, yarn over your hook, pull through first two loops, yarn over your hook and pull through the last two loops. Then to chain 1, just yarn over your hook and pull through the loop on your hook*. Now repeat ** 6 more times.

You should now have 8 treble crochets and chain 1 spaces. Slip stitch into your original 4 chains and fasten off.
3 – Attach your new yarn into the chain 1 space and chain 3 & then work 2tr into same chain 1 space. Now work 3tr into every other chain 1 spaces. (24 tr) 
Here is your chain 3 and 2 treble crochets. This acts as your first group of 3 treble crochets.

And as before, slip stitch into the original 3 chains and fasten off.
4 – Attach your new yarn into a stitch and then Chain 2 (this will give you the height of your first htr.) Then work 1htr in the same stitch. This counts as 2htr. Now crochet 2htr in each stitch all the way around. (48 htr)

To work a htr *yarn over the hook. Insert through the stitch, yarn over hook and pull through. This will give you 3 loops on your hook. Now yarn over the hook and pull through all 3 loops*. This completes your first htr. In the next stitch repeat ** twice each stitch and continue this all the way around your mandala.

Once you have 48 stitches (2 htr in each stitch) then slip stitch into the original 2 chains and fasten off.
5 – With this round you need to attach the new yarn into a stitch and then chain 3, miss a stitch, then 1dc. This acts as 1dc and 2 chain stitches then 1 dc. Now *dc, chain 2, miss a stitch and dc into next stitch.* Now repeat ** all the way around. (16 chain 2 spaces)

You should now have 16 spaces in total. Once again you need to slip stitch to the original 3 chains and fasten off.
6 – Attach your new yarn into a 2 chain space and chain 4. (This will give the height for a dtr.) Then 1dtr into same space and chain 2. In the *next chain space work 2dtr and then chain 2*. Repeat ** all the way around. (16 2dtr spools)

So here the 4 chains are giving you the correct height. So now to crochet a double treble crochet (dtr) you need to put the yarn over the hook twice and insert through the stitch.

Now yarn over the hook and pull through the stitch. This should give you 4 loops on your hook. (It’s quite a long process this dtr – isn’t it!!) Ok so now yarn over the hook again pull the yarn through the first 2 loops on the hook. Then yarn over your hook and pull through the next two loops on the hook.

Phew, nearly there. So yarn over the hook again and pull through the last two loops on the hook. And there you have it, a double treble crochet.

Now *chain 2 and then for 2 dtr in the next chain space*. Repeat ** all the way around. Then slip stitch into the original 4 chains and fasten off.
7 – Now you are ready to attach the next new colour into a chain 2 space. Firstly chain 3, then work 4tr into the chain 2 space. Then work 5tr into each chain space after that. (16 spaces x 5trs)
Don’t forget at the end to slip stitch to the original 3 chains and fasten off.
8 – This round is a little bit different as it includes 3 different types of stitches – half trebles, trebles and double trebles. Ok so first of all chain 2 into one of the first stitches of a set of 5 trebles. (This acts as your first htr), then tr, dtr, tr, htr. This is the first 5 stitches. Now *htr, tr, dtr, tr, htr* in the next 5 stitches. 
Once you have completed this first 2 sets of stitches, repeat ** this process all the way around the mandala. Now slip stitch to the original chain 2 and fasten off. (80 stitches)
9 – For this round attach your new yarn into one of your htr stitches and chain 6. Now miss 3 stitches then 1dc into the next stitch. This completes your first loop. (16 x 5 chain loops)

Now *1dc into the next stitch, miss 3 stitches, chain 5 then 1dc.* This gives you little loops that you will crochet your next round into. Repeat ** all the way around.

Once you have worked your stitches all the way around, slip stitch into the original 6 chains and fasten off.
10 – Now attach your new yarn into a chain 5 space and chain 3. Work 4tr into the same space. Then *chain 1, 5tr into space*. Repeat ** all the way around the mandala. And as before, once you have completed the round, slip stitch into the original 3 chains and then fasten off. (16 spaces x 5 trebles and 1 chain)

11 – This is similar to round 9. So as before, attach your new yarn into a chain 1 space and chain 9, then dc into the next chain 1 space. (16 spaces x 6 trs and chain 1)

Now *chain 7, then dc into the next chain 1 space*. Repeat ** all the way around the mandala.

As before, slip stitch into the original chain 1 space and fasten off.
12 – This is the last round of the mandala. Once again this is similar to round 10. So attach your new yarn into a chain 7 space and chain 3. This will give you the height and counts as the first treble. Now work 5 trebles into the same chain space then chain 1. Now work *6tr into the next chain space then chain 1*. Repeat ** all the way around. Then slip stitch into the original 3 chains and fasten off. Woohoo you are finished!!!!

Now it’s that time of any project when you wish you had threaded your ends in as you went along!! Haha! Luckily this isn’t a big mandala, so these little wiggly ends won’t take long. When weaving in your ends, use a blunt ended tapestry needle and just weave in and out of the stitches at the back and cut off the tail when you are happy with each one.

And here it is. My September Mandala.
And here it is with the colours arranged in a different order. Amazing the difference! I can see my daughter nabbing this one for her room!

I like to use my mandalas for plant pots and vases.

But you could also use them on the table when serving food.
Hope you have enjoyed this pattern. I can see me making it in lots of different colours from different months and seasons of the year.
Another idea is that you don’t have to use all the rounds that I have given you. Here’s one I’ve made but finished on round 7. It would be nice as a coaster for someone. 
Here’s the pattern in its simplest form.
1 – Magic ring, chain 3 into the magic ring and work 7tr. Pull your tail and create your first round. Slip stitch to the original chain 3 and fasten off. (8 tr)
2 – Attach the new yarn into one of the stitches and chain 4. This counts as 1tr & 1ch. Now carry on round crocheting 1tr and chain 1 into each space. Slip stitch into your original 4 chains and fasten off. (8 tr & ch1)
3 – Attach your new yarn into chain 1 space and chain 3 & then work 2tr into same chain 1 space. Now work 3tr into every other chain 1 space around the mandala. And as before slip stitch into the original 3 chains and fasten off. (24tr)
4 – Attach new yarn into a stitch and then Chain 2. Then work 1htr in the same stitch. This counts as 2htr. Now crochet 2htr in each stitch all the way around. Slip stitch into the original 2 chains and fasten off. (48 htr)
5 – With this round you need to attach the new yarn into a stitch and then chain 3, miss a stitch, then 1dc into the next stitch. This acts as 1dc and 2 chain stitches then 1 dc. Now *1dc, chain 2, miss a stitch and dc into next stitch.* Now repeat ** all the way around. (16 chain 2 spaces)
6 – Attach your new yarn into a 2 chain space and chain 4. (This will give the height for a dtr.) Then 1dtr into same space and chain 2. In the *next chain space work 2dtr and then chain 2*. Repeat ** all the way around. Then slip stitch into the original 4 chains and fasten off. (16 2dtr spools)
7 – Now you are ready to attach the next new colour into a 2 chain space. Firstly chain 3, then work 4tr into a 2 chain space. Then work 5tr into each space after that. Slip stitch to the original 3 chains and fasten off. (16 spaces x 5trs)
8 – This round is a little bit different as it includes 3 different types of stitches – half trebles, trebles and double trebles. Ok so first of all chain 2 into one of the first stitches of a set of 5 trebles. (This acts as your first htr), then tr, dtr, tr, htr. This is the first 5 stitches. Now *htr, tr, dtr, tr, htr* in the next 5 stitches. Repeat ** all the way around the mandala. Slip stitch to the original chain 2 and fasten off. (80 stitches)
9 – For this round attach your new yarn into one of your htr stitches and chain 6. Now miss 3 stitches then 1dc into the next stitch. This completes your first loop. Now *1dc into the next stitch, miss 3 stitches, chain 5 then 1dc.* Repeat ** all the way around. Slip stitch into the original 6 chains and fasten off. (16 x 5 chain loops)
10 – Now attach your new yarn into a chain 5 space and chain 3. Now work 4tr into the same space. Then *chain 1, 5tr into space*. Repeat ** all the way around the mandala. And as before, once you have completed the round, slip stitch into the original 3 chains and then fasten off. (16 spaces x 5 trebles)
11 – This is similar to round 9. So as before, attach your new yarn into a chain 1 space and chain 9, then dc into the next chain 1 space. Now *chain 7, then dc into the next chain 1 space*. Repeat ** all the way around the mandala. Slip stitch into the original chain 1 space and fasten off. (16 spaces x 6 trs)
12 – This is the last round of the mandala. Once again this is similar to round 10. So attach your new yarn into a chain 7 space and chain 3. This will give you the height and counts as the first treble. Now work 5 trebles into the same chain space then chain 1. Now work *6tr into the next chain space then chain 1*. Repeat ** all the way around. Then slips stitch into the original 3 chains and fasten off. Woohoo you are finished.
And there you have it.
Please don’t hesitate to ask any questions and I will help as best I can. Don’t forget to send any pictures of your own too. Would love to see them.
🌈Xx


