🎄Super Sprout Pattern🎄

Well hello all. Hoping you have all had a wonderful Christmas day, filled with love, fun & magicalness!! Can’t quite believe it’s already over!! It’s amazing how long we spend building up to the big day and then it’s over in the blink of an eye. It’s all worth it though to see the magic and wonder in our children’s faces and the happy smiles when you give your homemade gifts!!

But I can imagine that many of you are feeling a little low, as if you’ve just run a marathon and now you’re not sure what you should be doing!! You may also be feeling a bit down that Christmas is all over for another year!! Well if anyone is feeling a little sad by it all, then I may have the solution. You can crochet your very own little Super Sprout, to remind you of your happy Christmas Day with that yummy Christmas dinner. And it may also remind you of the conversation about who does and doesn’t like sprouts!! Haha!! I swear every Christmas table must discuss it!! That and what do you put in your Boxing Day sandwich! Now, I may have lost a few of you there, as some people will be like ‘what on earth?!?’ But there will be a few of you that could receit exactly what they have in that once a year special sandwich & to the point of what goes in which layer!! Love it!! (I know I could!!)

Anyways, my little Super Sprout is here to help. He will definitely brighten up your day and be all ready for next year’s Christmas!! I’m sure you are wondering why I even came round to crocheting a Sprout, well here’s how.

The other day we were in the supermarket, getting our big Christmas shop and we spotted a lowly little Sprout all by itself on the floor. It was nowhere near its little friends! My daughter immediately said it must have been a Super Sprout, that spends its evenings keeping the naughty peas in check in the supermarket. “It’s just like in the book!” She squealed!! She was referring to the Supertato book that they had read in Reception as a class.


The super potato basically saves the vegetables from a naughty pea that escapes from the freezer and causes havoc!!! She then insisted that I must crochet one and that I could put it on my blog! So without further a do. May I present Super Sprout. (You have to admit, he’s rather sweet!) He’s been snuggled up in my daughter’s bed since Christmas morning!! Anywho, back to crocheting. Right usual information on stitches here and supplies and then the pattern. Photos are on the go, so hope they all make sense. I only had a day to make him. So it was a bit of a quick one this one. She definitely loved finding him under the Christmas tree.

Stitches

Slip stitch (ss) – This is where there is no height to the stitch. It’s usually used to join rounds. So insert the hook into the front of the stitch you are joining to. This is usually the first stitch you made in that round/row. So yarn over hook and pull through that first stitch then also through the loop on your hook.

Double Crochet (dc) – Insert the hook through the stitch, front to back, then yarn over hook and pull back through stitch. You will have two loops on your hook. Then yarn over your hook and pull through both loops.

Double Crochet Decrease (2dctog) – This is where you crochet two stitches together to decrease the amount of stitches in the round. So insert the hook through the front of the first stitch only (the front V) and then insert again through the front of the second stitch (the front V). Now yarn over your hook and pull it back through both stitches, so you will then have 2 loops on your hook. Yarn over your hook again and pull through both loops. And there is your 2dctog. (Basically 2 double crochet stitches crocheted together.)

Treble (tr) – To make a treble crochet, firstly yarn over your hook, insert through space/stitch, yarn over your hook, pull back through space/stitch. There should now be 3 loops on your hook. Then yarn over hook and pull through the first two loops, yarn over hook and pull through the last two loops.

Half treble (htr) – A half treble crochet is basically one less movement than a treble. So yarn over hook, insert through space/stitch, yarn over hook, pull back through space/stitch. There should be 3 loops on your hook. Then yarn over hook and pull through all 3 loops.

Double treble (dtr) – A double treble is quite a tall stitch. So yarn over hook twice, insert hook through the stitch/space and then yarn over hook again. Now pull the yarn through the stitch. There will now be 4 loops on the hook. Now place the yarn over the hook and pull through the first 2 loops. Then yarn over the hook again and pull through the next two loops. Haha, now place the yarn over the hook again and pull through the last 2 loops. Phew! It’s a bit of a long process, but a lovely stitch with the height that it gives.

Supplies

So for Mr Super Sprout you will need some green yarn, I have used stylecraft cotton, but you can use wool or any green yarn really. Some scissors, a blunt ended tapestry needle, some toy stuffing and little bit of black yarn for the face. Oh and I nearly forgot a 3mm and a 4mm hook. The 3mm hook is for the body and the 4mm hook is for the leaves.

So here we go…

Body – use a 3mm hook with your green yarn. You are working in the round for the body.

1 – Make a magic ring, chain 1, then dc6 into the ring. Then pull the tail tight to create the first round. (6)

2 – *2dc into each stitch.* Work ** 6 times. (12)

3 – *1dc, then 2dc into each stitch.* Work ** 6 times. (18)


4 – *2dc, then 2dc into each stitch.* Work ** 6 times. (24)

5 – *3dc, then 2dc into each stitch.* Work ** 6 times. (30)

6 – *4dc, then 2dc into each stitch.* Work ** 6 times. (36)

7 – *5dc, then 2dc into each stitch.* Work ** 6 times. (42)


8 – 13 For each round, 1dc in each stitch. (42)

14 – *5dc, then 2dctog*. Work ** 6 times. (See stitches explanation above if you are unsure of 2dctog.) (36)

15 – *4dc, then 2dctog* Work ** 6 times. (30)

16 – *3dc, then 2dctog. Work ** 6 times. (24)

17 – *2dc, then 2dctog.* Work ** 6 times.(18)

18 – *1dc, then 2dctog.* Work ** 6 times.(12)

Now it’s time to stuff your body with toy stuffing,

19 – Work 2dctog 6 times (6)

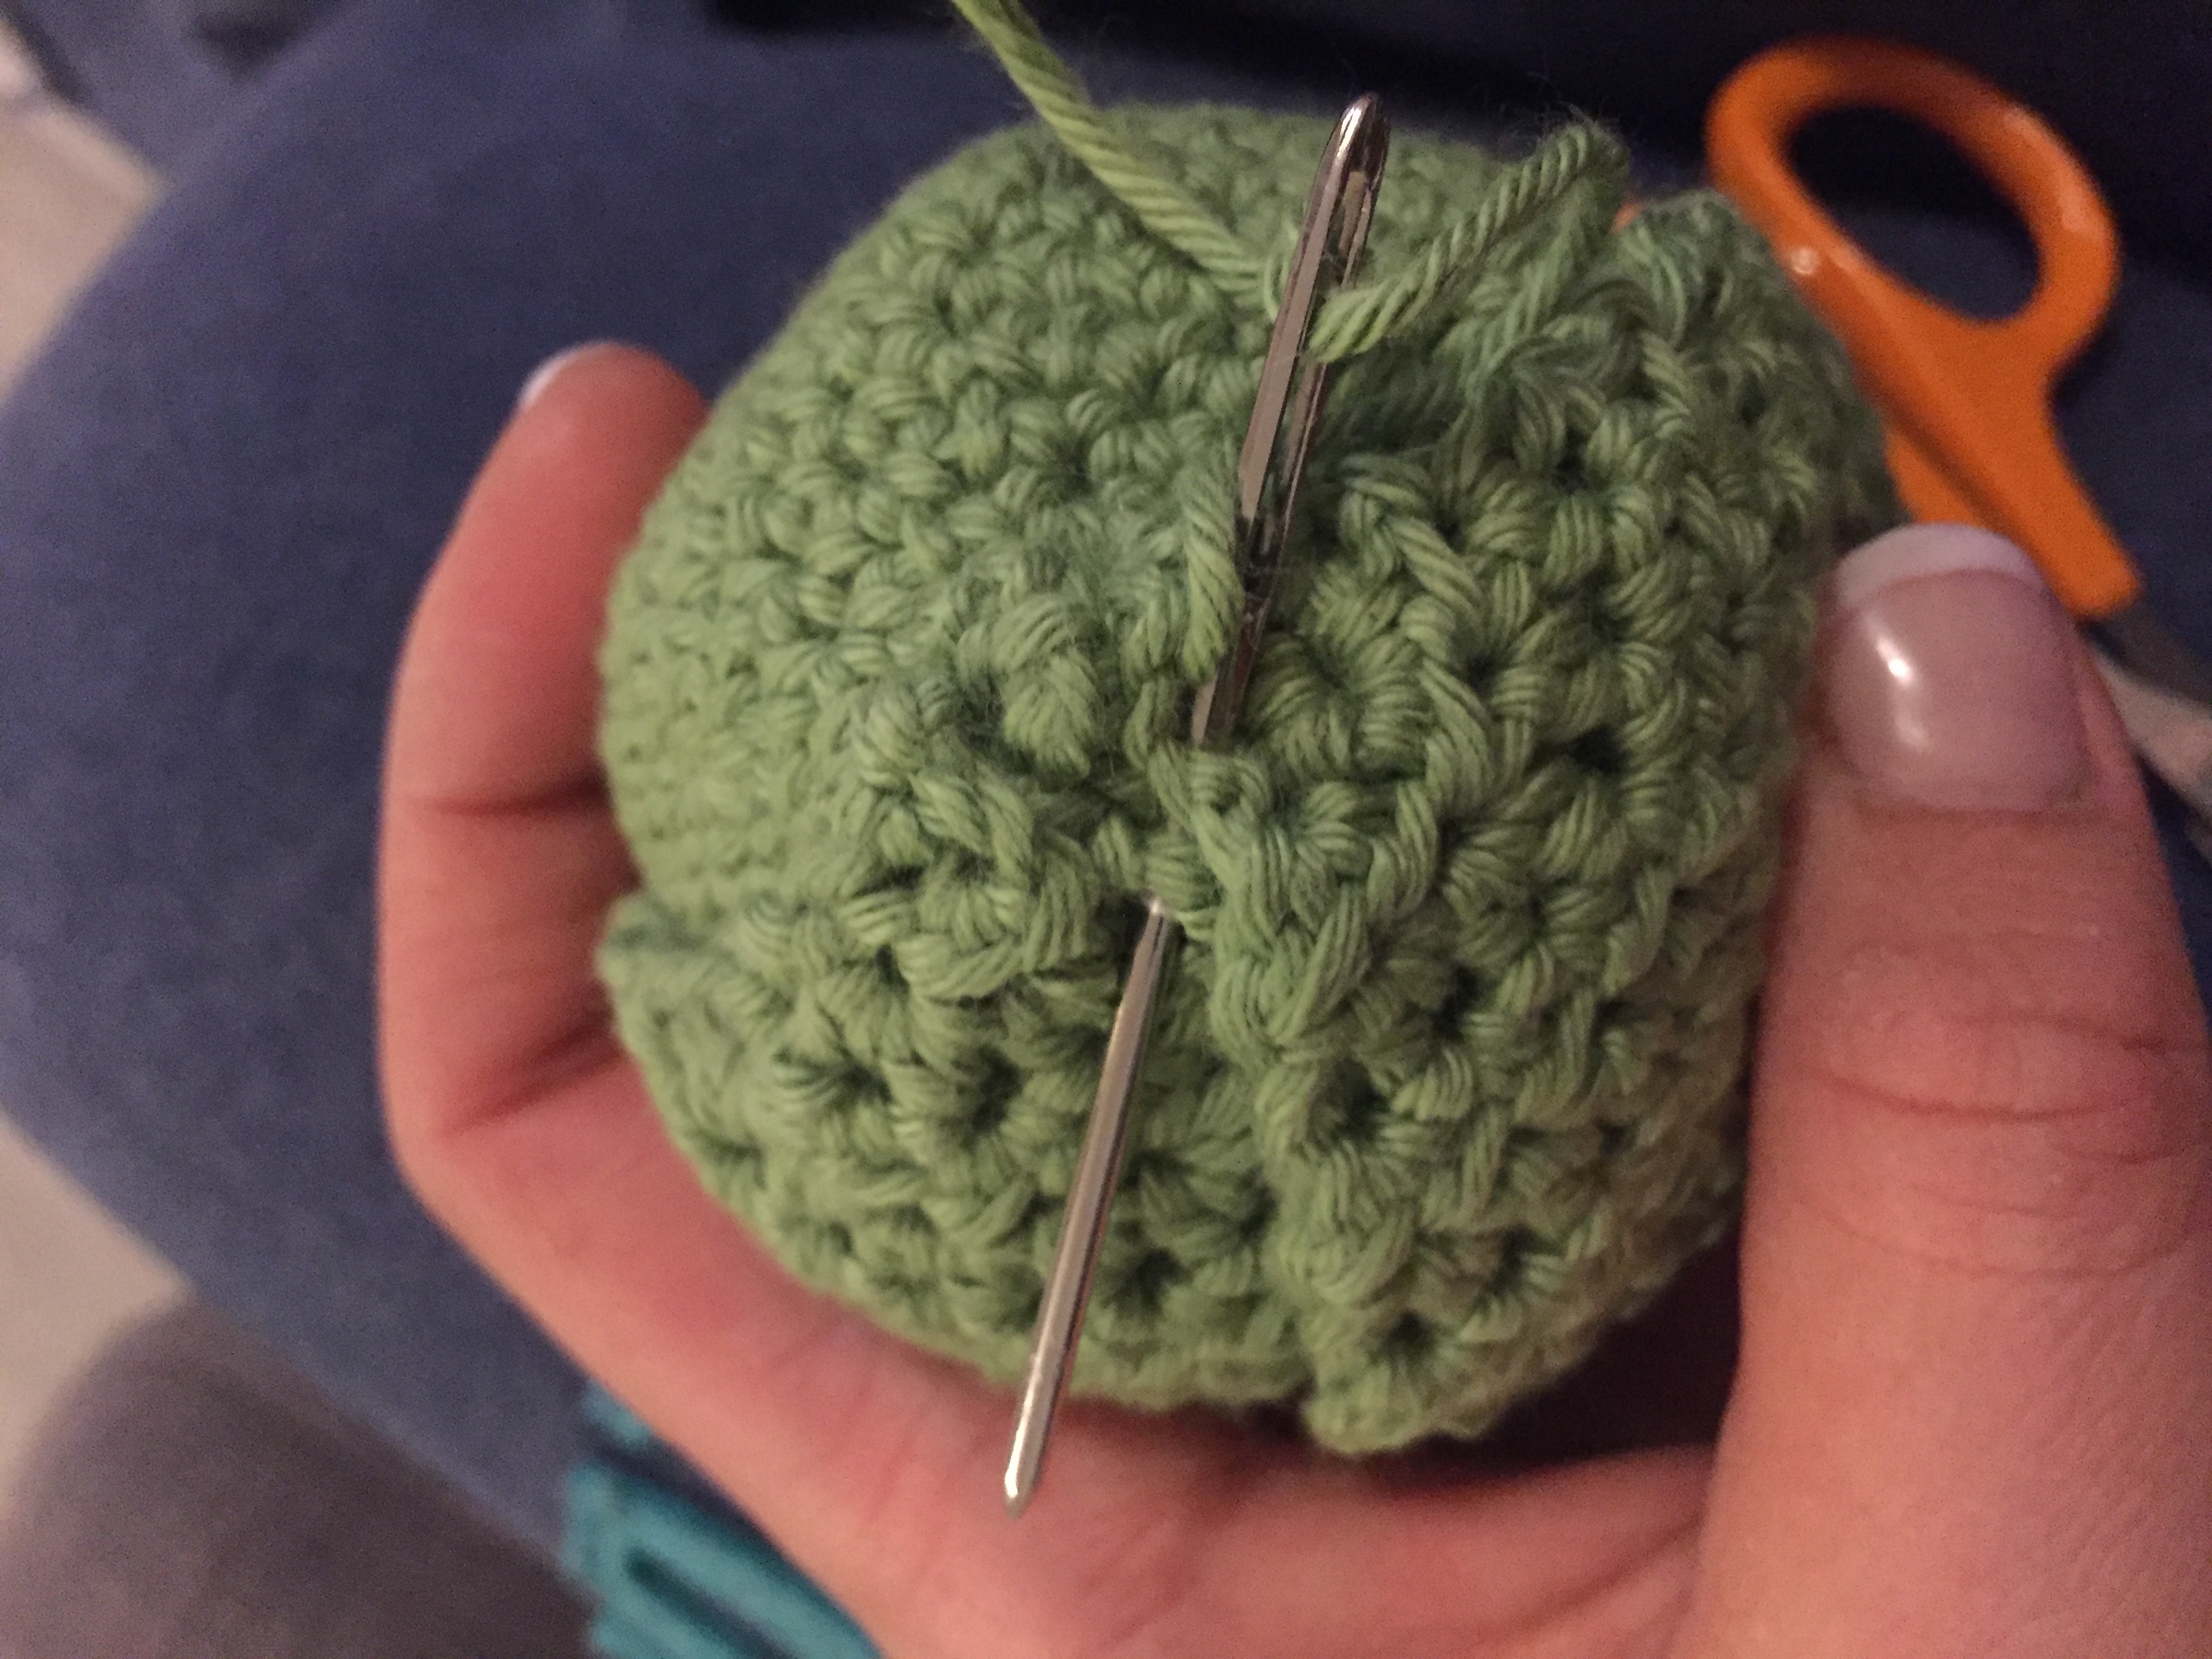
Now sew up and fasten off your body using a blunt ended tapestry needle. You will notice that it gives a little bit of a point. This is where you can attach the base of your 4 leaves to.

Leaves – use a 4mm hook with your green yarn. Make two of each size. (Two small and two large.) For all of the leaves you are now working in rows and not rounds.

For both leaves –

1 – Make a slip knot on your hook and chain 4.

2 – Now work a htr into the third stitch from the hook and another htr into the next stitch from the hook. Turn your work now, so that you can crochet back along the row. (2)

3 – In this row, chain 2 and work 2htr stitches into each stitch and turn your work. (4)

4 – Then chain 2 and *work 1htr into the same stitch, then 2htr into the next stitch.* Repeat ** twice and then turn your work. (6)

5 – Then chain 2 and *work 2htr, then 2htr into the next stitch* Repeat ** twice and turn your work. (8)

6 – Now chain 2 then *work 3htr, then 2htr into the next stitch.* Repeat ** twice and turn. (10)

7 – Now chain 2 and then work *4htr, then 2htr in the next stitch.* Repeat ** twice and turn your work. (12)


Now make two small leaves:

8 – 9 For each row, chain 2 then work 1htr into each stitch and turn. (12)

Now make two large stitches:

8 – 11 For each row, chain 2 then work 1htr into each stitch and turn. (12)

Now the next two rows are the same for both the small and the large leaves. So you are either on round 10 for the small leaf or round 12 for your large leaf.

– Slip stitch into the first stitch, dc, htr, tr, tr, dtr, dtr, tr, tr, htr, dc then lastly a slip stitch. Then turn your work. (12)

– For the last row, miss the first stitch then slip stitch into the next stitch, then dc, htr, tr, dtr, dtr, tr, htr, dc, then miss a stitch and slip stitch into the last stitch and fasten off. (10)

Right so this is what you should now have in front of you. One round ball, two large leaves and two small sprout leaves.

Now it’s time to sew the Sprout leaves in place. So start off by using the tail from the base of the leaf. So find the tip of the Sprout ball (its slightly raised) and using a blunt ended needle, sew on the first leaf base and fasten off. You will only be able to sew on the base as your tail of yarn is quite short.

Now move to the top of your sprout and using the top tail sew on the sides on the leaf but not the top.

Leaving the top part free, allows the leaf to have some movement.


Then carry on adding the other 3 leaves in the same way.


And now for the fun part. The eyes, eyebrows and smile. You need your black yarn, needle and scissors. (Don’t forget you can make the expression anyway you like.)

For the eyes. Attach by knotting one end and threading it through a gap in between a stitch at the back of the body. This will hide the end. Now pull the needle through where you would like the eye to be. I tend to sew over one stitch to make the eye and sew over this stitch about 5 times. You can add eyebrows in the same way but with one stitch. I love the simpleness of the eyebrows. They can make such a difference to a face!!


For the mouth. Pull the yarn through where you would like the mouth to start then thread back through where you want the mouth to finish. Now here’s the tricky part. You now need to anchor the mouth in the middle to make it a smile. So simply push the yarn back up in the middle of the mouth by one stitch lower, go over the top of the mouth, then back through the same stitch. This will give you the smile. Again simple, but effective.

And there you have it – one little Super Sprout to keep you feeling that little bit Christmassy. I was thinking today, you could make a whole family of sprouts or even crochet them some Santa hats!! Proper cute.

Well I hope you have enjoyed my post. As always, if you have any questions or queries at all, please don’t hesitate to ask!! Looking forward to seeing all other little sprouts made – don’t forget to share your little fellas on here or on instagram/facebook by linking it to  #pipsrainbow

Happy hooking everyone!!

🌈 Xx


Continue Reading

Snugglepod Pattern

Everyone needs a Snugglepod

May I present the newest member to my crocheting world – the snugglepod. A little snuggly nest for all our little ones precious toys. Mr and Mrs Mouse are here demonstrating the loveliness of their new home in a rather nice purple snugglepod. Bless them. These two little mice have been well and truly loved by my daughter over the past four years. As you might have guessed, they represent my husband and I in our household. They have recently taken up lodgings in one of my snugglepods and they seem quite happy in there. (To be honest, I would quite like to be snuggled up in there – especially on a chilly night like tonight!) Snugglepods are the way forward – spread the word!!

I reckon if you made adult ones of these, they would sell like hot cakes!! Now that it’s getting that little bit cooler in the day, I have put on the snugglepod, as I call it, onto the pram for my son. Basically it’s a sleeping bag to keep him all cosy and warm. I stupidly tried to add this to the pram, minutes before I was suppose to leave for the school run, which didn’t end well!! I was feeling all confident and like yeah, I know what I’m doing, this is easy – it’s just 3 straps!!! Yeah right! Needless to say I ended up running to get my daughter and the snugglepod was definitely not fitted properly. Oh well. He was warm and he didn’t fall out, which was the main thing.

The amount of comments you get about it are quite interesting. “Ooo, doesn’t he look toasty in there. I wish I could be in there and be pushed around.” I swear if you made some adult sized ones and marketed them for watching TV in or sitting as a passenger in a car, they’d be very popular. I wonder if you could make ones with arms in so that you could still drink your hot coffee, or wine if you prefer, and another arm for the remote. Wouldn’t that be good. Hang on – you could lie in one and crochet!! Now there’s a thought!

So snugglepods for toys was a definite must in my book. How many of us remember tucking up our little precious toys with mini blankets? For some reason in our house, it was hankerchiefs! I don’t know why, but we had a lot of pretty little hankerchiefs! I wonder if my daughter would even know what a hankerchief was?!? I think they were from my grandparents – will have to ask Mum. So it got me thinking about creating snugglepods.

The one thing I’ve noticed about my daughter is how she loves to put her little teddies & toys to sleep. It’s really quite cute. The toy of the moment gets tucked up in little blankets at night time to ensure they are all warm and cosy. When I was a girl, I was a major lover of Sylvanian families. So at night all the little creatures would find their way into their beds. I would have loved having these little crocheted nests for all my toys. They would have been all snuggled up each night. So there you have it. The snugglepod was born. My daughter has already ordered at least 10! I reckon she would have one for every little toy or teddy in her room. Her lovely Nanabella turned up today with a little collectible pegasus toy which she fell in love with. To her delight it glows in the dark. So quick as a flash she was on the floor under her school coat to see if it would work. Bless! But as a result of her new little toy, a brio girl was outted and her new little pegasus found it’s way into her snugglepod.

To my husband’s delight, our son is already showing signs of loving cars. He seems to like pushing them around the house and then giving them a quick chew. So I gave him one of the bigger snugglepods and one of his cars to see what he did with them! And bless his cotton socks, he put his little car in the snugglepod like it was a garage!! So cute! I can see me making these for him too and maybe attaching them altogether to make a car garage. That’s what’s so great about them, they are so versatile. I think I had better make him some in boy colours though!!

This one is the extra large, so my son managed to fit two in here. The little yellow one is his favourite.

One thing I’ve realised is that these little snugglepods are a lovely addition to a present for somebody. It’s extremely easy and quick to make up and you only have two ends to weave in at the end!! Bonus!! Now you can make these in any size you like. I’ve made a list of how to make them, ranging from large to tiny. It’s all about what size yarn you use or about how many strands of a certain yarn.

Stitches

Magic Ring (mr) – For a magic ring, make a loop with the yarn, leaving a tail. (Make sure the tail is under the working yarn.) Now insert your hook into the loop, from the front to the back. Wrap the working yarn around your hook and pull the yarn through and pull tight to create a ring.

Slip stitch (ss) – This is where there is no height to the stitch. It’s usually used to join rounds. So insert the hook into the front of the stitch you are joining to. This is usually into the first stitch you made in that round/row. So yarn over hook and pull through that first stitch then also through the loop on your hook.

Half treble (htr) – A half treble crochet is basically one less movement than a treble. So yarn over hook, insert through space/stitch, yarn over hook, pull back through space/stitch. There should be 3 loops on your hook. Then yarn over hook and pull through all 3 loops.

Increase with htr – to increase with a half treble crochet you just work 2 htr into the same stitch.

Decrease with htr (2htrtog) – ok so basically you need to crochet 2 stitches together, but still keep the height of a htr. So yarn over your hook and insert into stitch. Then yarn over hook and pull back through. This leaves you with 3 loops on your hook. Now yarn over your hook and pull through 2 loops. This will leave you with 2 loops on your hook. Now yarn over hook and insert into the next stitch. Then yarn over your hook again and pull yarn back through. This leaves you with 4 loops on your hook. Then to finish, yarn over your hook and pull through all 4 loops.

Using multiply strands of yarn – when I use more than one ball of yarn together I literally just grab the two or three ends of each ball and place them together in between my fingers. Then start crocheting as if they are one. The photo below is showing you 2 strands of dk cotton yarn worked into a magic ring.

It’s pretty simple. (I remember seeing my Gran do this, when she was knitting her slipper socks.) Just make sure each ball is free of the other as you are crocheting, as otherwise you might get in a bit of a tangle. I tend to let both of them sit on the floor. This photo below shows you the second round, 12 stitches, of 2 strands of yarn crocheted together.

Level – Easy

Supplies

You can use any kind of yarn to make your snugglepods. A nice soft merino wool would be lovely, but then a simple cotton yarn would do the trick too. You don’t need much yarn for a snugglepod, so these are great to use up any of those little balls of wool left over from a project. (If you are like me, your stash of these seems to be getting bigger!) You also need scissors, blunt ended tapestry needle and a small piece of different coloured yarn for a stitch marker.

So for your hooks it depends on which size of snugglepod you want to create.

Extra Large – Chunky wool or 3 balls of dk strands and a 9mm hook. 

Large –  2 balls of dk strands and a 6mm hook.

Medium – 1 ball of Aran and a 5 mm hook.

Small – 1 ball of dk and a 4mm hook.

Extra Small – 1 ball of dk and a 3mm hook. (Basically using a smaller hook, which creates a tighter stitch, leaving you with a smaller snugglepod.)

Tiny – 1 ball of 4ply and a 3mm hook. (This one is great for Lego and brio people.)

So here goes…

1 – Make a magic ring & chain 2. This will give you the height of a htr. Don’t forget to check the tutorials or the stitch explanation above if you are unsure of how to create a magic ring. Now 6 htr into the ring. If you are unsure of how to crochet a htr, you can also see the stitch explanation above. (6)

2 – Now work 2htr into each stitch. This means you are starting to increase your stitches. (12)

3 – Ok so now you need to crochet *1 htr, then 2 htr into the next stitch*. Repeat ** all the way around. Don’t forget to use a stitch marker as these are crucial when crocheting in the round. The stitch marker in this photo is the yellow yarn. If you are unsure of how to use them, find the tutorial to the side of the blog. (18)

4 – Now you need to crochet *2 htr, then 2 htr into the next stitch*. Repeat ** all the way around. Always remember to move your stitch marker as you go, folding it over each round, so you know where your round begins and ends. (24)

5 – Ok so in this round you need to crochet *3 htr, then 2 htr into the next stitch*. Repeat ** all the way around. (30)

6 – Then crochet *4 htr, then 2 htr into the next stitch*. Repeat ** all the way around. So you have now increased to 36 stitches in your round. (36)

7 – In this round work 1htr in each stitch. (36)

8 – Next crochet 2htr into the next 8 stitches. Then 1htr into the rest of the stitches in this round. This is where you are starting to create your snugglepod base. (44)

9 – In this round work 1htr into each stitch all the way around. (44)

10 – Now that you have created the base of the snugglepod, you need to create the top. So now 2htrtog. So to do this yarn over your hook and insert into the stitch. Then yarn over hook and pull back through. This leaves you with 3 loops on your hook. See photo below. Now yarn over your hook and pull through 2 loops.

This will leave you with 2 loops on your hook. Now yarn over hook and insert your hook into the next stitch. Then yarn over your hook again and pull yarn back through. This leaves you with 4 loops on your hook. Then to finish, yarn over your hook and pull through all 4 loops.

Now finish the round off. So work 11htr, 2htrtog, Ss into the next 2 stitches, then turn. This gives you 15 stitches in total. The reason you need to turn your work is because you are now only crocheting the top part of the snugglepod. So you will be working back and forth in rows.

11 – With the next few rounds always start in the second slip stitch from the hook. So htr in second stitch from hook, then 2htrtog twice, 5htr, 2htrtog twice. Now Ss into each of the next 2 stitches and turn. (12)

12 – Once again work  1htr into the second slip stitch from the hook, then 10htr. Now as before slip stitch into the next two stitches and turn. (13)

13 – Starting again in the second slip stitch, 2htrtog twice, 4htr, 2htrtog twice, Ss in the next 2 stitches and turn. (10)

14 – Now work a htr into the second chain from hook. Then 2htrtog, 3htr, 2htrtog, 1htr, ss in the next 2 stitches. (9)

15 – For the last row work 1htr in second stitch from hook then 7htr, ss in the next 2stitches. Now fasten off.

And there you have it. All that is left is to sew in those 2 ends.

For an extra bit of specialness, especially if your snugglepod is for a little girl, you might want to add a flower or two. So to make a large flower you need to first chain 6 and slip stitch into the first chain to make a ring. Then work 15 dc into the middle of the ring then fasten off the first colour. Rejoin your second colour into one of the dc and *chain 3. Now work 1tr into next 2 stitches then chain 3 and slip stitch into the next stitch.*  Now repeat ** 4 more times. This will give you 5 flower petals. At the end slip stitch into the original chain 3 stitch and fasten off and weave in ends.

For a smaller flower chain 4 and slip stitch into the first chain to make a ring. Then work 12 dc into the middle of the ring then fasten off the first colour. Rejoin your second colour into one of the dc and *chain 3. Now work 1tr into next 2 stitches then chain 3 and slip stitch into the nextstitch.* Now repeat ** 3 more times. This will give you 4 flower petals. At the end slip stitch into the original chain 3 stitch and fasten off and weave in ends, but leave a tail to attach the flower to your snugglepod.

To attach your flowers, use the tail you have left with a blunt ended needle and sew on to the snugglepod.

Here is the pattern for the Snugglepod in its simpliest form for all you crazy crochet lovers, who know what they are doing.

1 – Magic ring & chain 2. This will give you the height of a htr. Now 5 htr into the ring. (6)

2 – 2htr into each stitch. (12)

3 – 1 htr, 2 htr into the next stitch all the way around. (18)

4 – 2 htr, 2 htr into the next stitch all the way around. (24)

5 – 3 htr, 2 htr into the next stitch all the way around. (30)

6 – 4 htr, 2 htr into the next stitch all the way around. (36)

7 – 1htr into each stitch. (36)

8 – 2htr into the next 8 stitches. Then 1dc into the rest of the stitches. (44)

9 – 1htr into each stitch. (44)

10 – Now that you have created the base of the snugglepod, you need to create the top. So now 2htrtog, 5htr, 2htrtog, 5htr, 2htrtog, Ss twice then turn. (15)

11 – With the next few rounds always start in the second slip stitch from the hook. So htr in second stitch from hook, then 2htrtog twice, 5htr, 2htrtog twice, Ss into next stitch twice. (12)

12 – 1htr into second slip stitch from hook, then 10htr. Ss into the next stitch twice. (13)

13 – Starting again in the second slip stitch, 2htrtog twice, 4htr, 2htrtog twice, Ss twice and turn. (10)

14 – 1htr in second chain from hook. Then 2htrtog, 3htr, 2htrtog, 1htr, ss twice. (9)

15 – 1htr in second stitch from hook then 7htr, ss twice. Now fasten off and sew both ends in.

Really hope you have enjoyed this post and get cracking with your own snugglepods!! Trust me your children and grandchildren will love them.

Continue Reading